Snowshoeing in Kananaskis - Top Moderate Trails
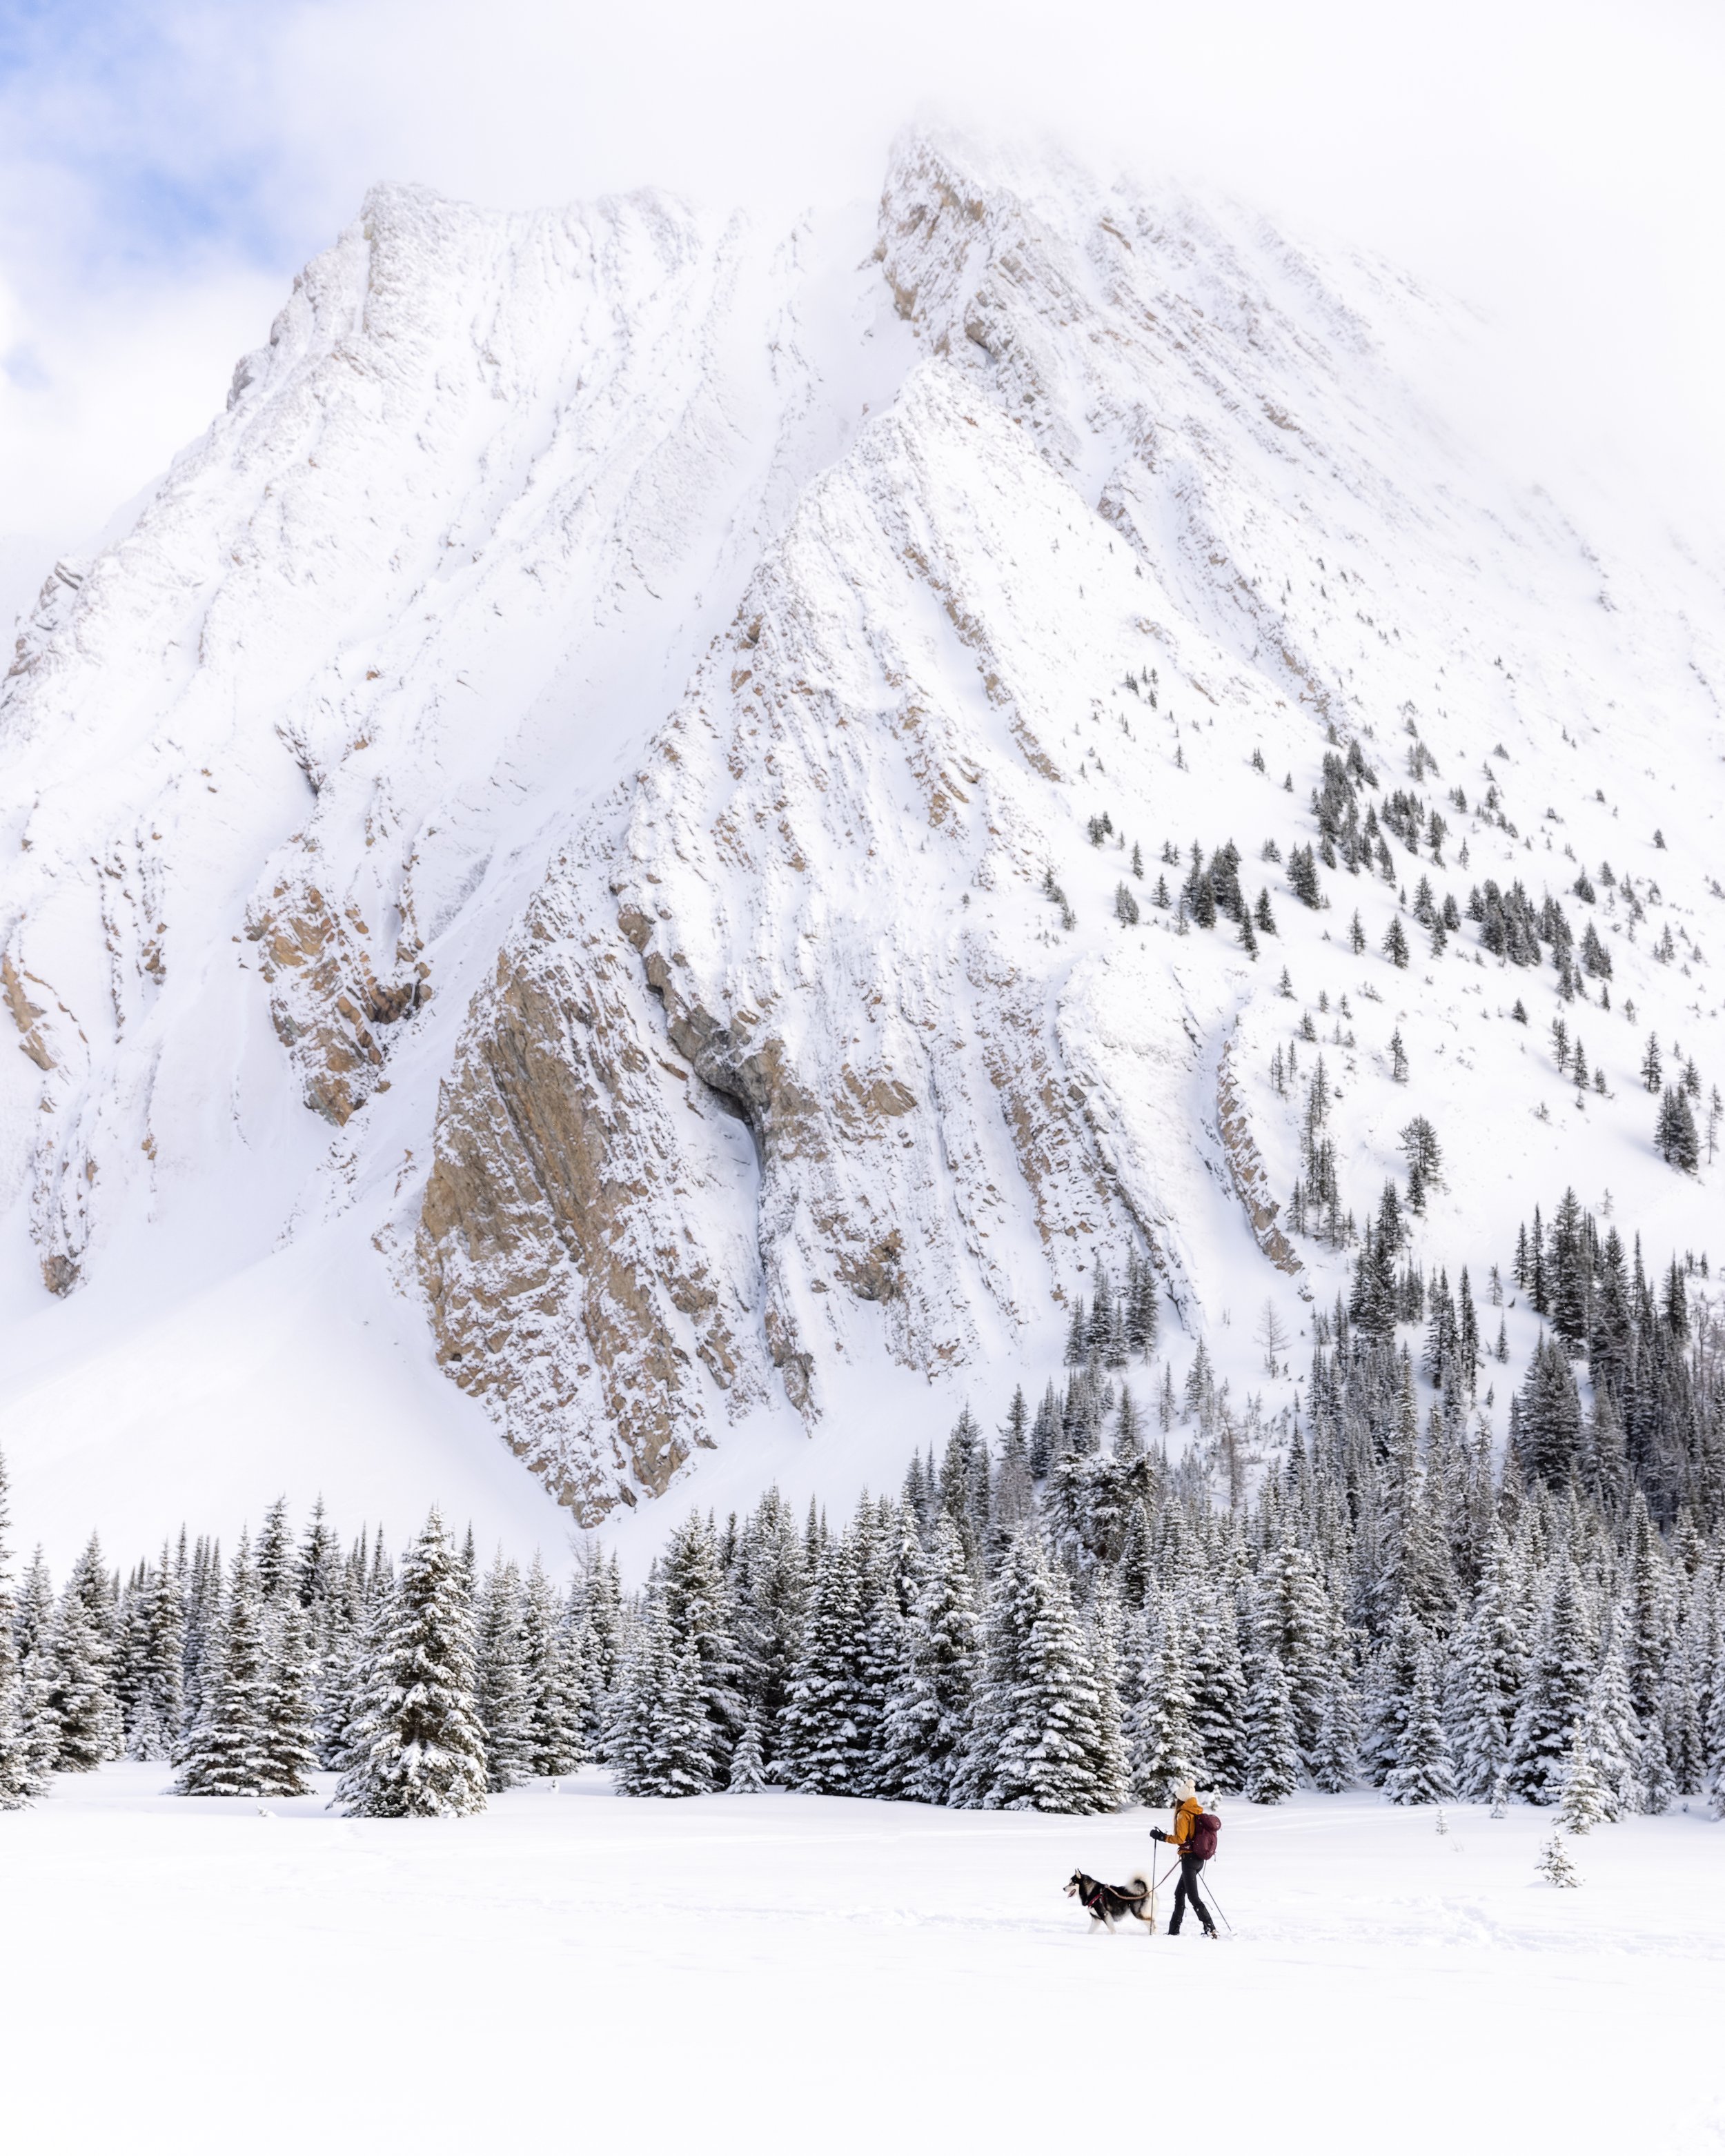
Snowshoeing is such a fun way to enjoy outdoors during the winter months. If you’ve never snowshoed before, don’t worry it is as simple as hiking. Snowshoes prevent you from sinking in deep snow and have crampons for steeper slopes. They might look clunky at first, but I promise you they are easy to walk in. Modern snowshoes are lightweight and easy to put on over your hiking boots or any waterproof winter boots of your choice. One of my favorite places to go snowshoeing in Alberta is Kananaskis Country. Only a short drive from Calgary, Kananaskis offers plenty of trails many with stunning mountain vistas and frozen alpine lake views. And they are still accessible in the snowy seasons and most of them have lower avalanche risk than trails in Banff National Park.
AVALANCHE EDUCATION CLASSES
When heading into the backcountry in winter, it’s important to keep safety in mind. Completing the Avalanche skills level 1 training (AST1) course can dramatically lower your risk of triggering an avalanche and will teach you on companion rescue techniques and trip planning expertise. This training helps you recognize hazardous terrain, and we will ensure that you know what to do when you encounter such regions. If you do not have your AST1, Avalanche Canada has some great free resources available such as Avalanche safety resources for snowshoers. Head to their Start Here page for a good introduction to avalanche safety, with a brief explanation of some of the most important things to know before you set out on your next snowshoe adventure. I would also recommend watching their online tutorial, Avy Savvy, before taking an Avalanche Canada Training course.
AVALANCHE SAFETY GEAR AND PRECAUTIONS
In addition to the 10 Essentials and extra clothing and food, you’ll also need to carry avalanche gear. Avalanche gear is considered your transceiver, probe and shovel. If you can guarantee you won’t be travelling in avalanche terrain, you don’t need avalanche gear. But if you’re unsure or if your route crosses through avalanche terrain, then you—and everyone in your group—need all three pieces of this safety gear along with the knowledge to use them.
BEFORE YOU GO:
If there’s a possibility that you will be travelling through avalanche terrain, make sure to read the avalanche bulletin for the day’s risk level and pack the appropriate safety gear. Check the Kananaskis snowshoe trail report for your trail before leaving home for possible closures or dangers to be aware of.
Here are some of my absolute favourite snowshoe trails in Kananaskis:
Chester Lake
Chester lake is such a beautiful snowshoe trail in the winter. It was actually the very first trail I snowshoed in Kananaskis. Blessed with tons of snow and stunning winter mountain scenery, Chester Lake trail is very popular and easily one of the best snowshoe trails in Kananaskis. The trailhead is located at Chester Lake Day Use parking lot. The trail starts off in the snow covered forest and leads you up to Chester Creek, once you cross the creek watch out for snowshoe trail signs which is usually clearly marked. Be careful not to go on a XC skiing trail. And although the first half of the way to the lake is relatively steep, then it opens up into a gorgeous meadow and more enjoyable flat terrain.
Length: 3.4 km one way | Elevation Gain: 287 m | Route Type: Out-and-Back
Difficulty Notes: Moderate. Be aware of avalanche risk when snowshoeing past Chester Lake to the Elephant Rocks

Rummel Ridge
The Snowshoe trip to Rummel Ridge is a relatively safe and easy ascent to one of the most scenic viewpoints in Kananaskis Country. The trail starts at an unmarked trailhead on the east side of the Smith-Dorrien/Spray Lakes Trail (Highway 742) about 1.4 kilometres north of the junction with Mount Shark Road. If you get lucky and the trail is broken, but if you don’t you are in for a great workout, which also makes route finding a bit difficult. Follow the GPS. The Rummel Ridge snowshoe route up the steep west slope comes with some degree of avalanche risk. The route we used ascends the ridge via its northwest arm, essentially avoiding all avalanche risk. At the top of the ridge you will be rewarded with spectacular panoramic views. You have stunning Mount Galatea on one side and those of massive peaks across the valley.
Length: 7.0 km return | Elevation Gain: 680 m | Route Type: Out-and-Back
Difficulty Notes: Moderate. No major difficulties other than possible trail breaking. No avalanche risk if ascent via NW slope.

MSR Evo Ascent snowshoes, Ewool Pro+ Heated Vest, Ewool Heated Gloves, Glyder High Waist Pure Pocket Leggings, Patagonia Better Sweater Full Zip, Zamberlan Trail Lite EVO Boots, Black DiamondAlpine Carbon Cork Trekking Poles, Osprey Skimmer 28 Backpack, similar Pom Beanie, Izipizi Glacier Glasses, MEC gaiters
Gypsum Ridge
A great snowshoe trip with a nice payoff at the end. The out and back route starts with a descent to Smith-Dorrien Creek which was nicely frozen over. After crossing the creek there was a set of switchbacks it was a steady grind up through the trees for about 200 meters on a fairly well-worn snowshoe track. You'll notice once you get to the highest point of the ridge that there's still a bit of the ridge to the east - I highly suggest you make the extra 5 minute walk as that's where the best views are. The steepness of the slope and the narrowness of the trail give the illusion that the point is very exposed, but it's not. Great 360° view of the whole valley and frozen Kananaskis Lakes.
Length: 6.5 km return | Elevation Gain: 600 m | Route Type: Out-and-Back
Difficulty Notes: Moderate


Commonwealth Ridge
This route does require some route finding skills as there isn't a set route for winter. Lots of the broken trails are ski tracks to the back bowl (serious avalanche terrain!), so don't rely on being able to follow tracks. Easy to get cliffed out. Definitely requires a bit of trail breaking. There is some potential for avalanche risk as you ascend. Unless you have avalanche gear, crampons, an ice axe, and know how to use them, do not go past the 'north' summit (where the trees stop). This is where we stopped is at the false peak (the shoulder pictured below). The views are still incredible and you get a great perspective of what lies beyond Commonwealth.
Length: 7.5 km return | Elevation Gain: 790 m | Route Type: Out-and-Back
Difficulty Notes: Moderate to difficult (avalanche) terrain to the true summit depending how much snow there is on route.


There are affiliate links in this blog post. If you make a qualifying purchase through one of these links, I may receive a small commission at no extra cost to you. Thanks for your support! ♥️
HOW TO CHOOSE SNOWSHOES
REI has a wonderful and helpful blog on how to chose the right snowshoes. Check it out.
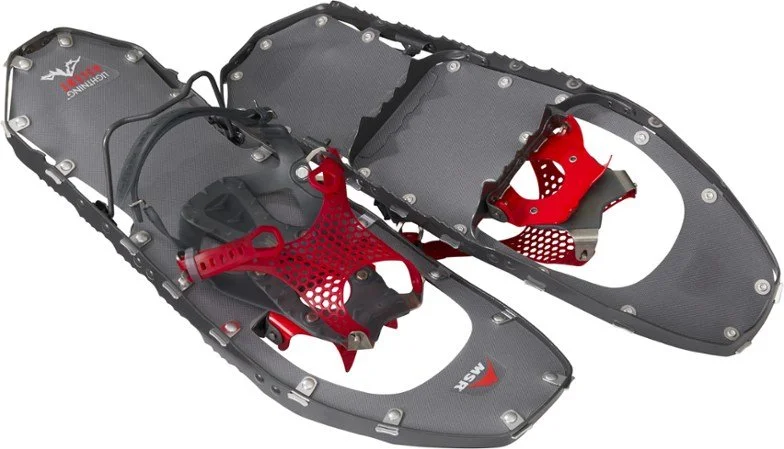
I have used my MSR Evo Ascent snowshoes for three seasons now and I am quite happy with them. They are great for both packed snow and loose powder, and are decently lightweight and durable. The crampons provide excellent traction and the heel risers are amazing for steeper trails and definitely save my calves on inclines and are easily engaged with a glove-friendly pull tab. They have held up to anything I have put them through so far, including early season snow mixed with rocks, frozen creeks, and deep powder. My one modification was to flip the black strap clips on the bindings to face down (see photo below) to eliminate the ends coming loose and becoming undone. The one other downside is they are little “noisier” on hard-packed snow, but usually if the snow is that hard, you are better off with micro-spikes instead anyway. If you snowshoe intermittently or prefer flat to mildly rolling terrain, you can get away with a cheaper pair of snowshoes. But if you like the backcountry, breaking trail and climbing to ridges, the Evo Ascents are pricey, but are worth considering.
Technical Specs: 20 x 56 cm (supporting load up to 180 lbs / 80 kg). Weight per pair: 3 lbs 15 oz / 1.78 kg. Footwear size range (Standard): 4.5 M - 15 M. Binding type: TriFit. Made in the USA.
As a note, MSR snowshoes also have a tail extender option, which attaches to the snowshoe to provide extra length for better floatation in deep snow. The tail extenders can bring the weight support up to 250 lbs.

Another great option is: MSR Lightning Ascent Snowshoes
MSR Lightning Ascent Snowshoes - Women's

MSR Lightning Ascent Snowshoes - Men's
WHAT TO WEAR SNOWSHOEING
Warm comfortable clothes to snowshoe in think wool or fleece or (preferably not cotton), dress in layers; long underwear, a mid layer (ex: fleece or softshell) and a jacket are perfect. Warm toque, warm gloves or mitts. You can read more on layering in my Hiking Blog.
I highly recommend wearing merino wool base layers in the winter. I absolutely love my Kari Traa base layers. Gortex gaiters are also a smart accessory to wear while snowshoeing because they help keep snow out of your boot tops and keep your legs toasty. (Even snowshoeing on a packed trail can involve moments when you have to step off the trail.)


WHAT TO PACK
Must Gear: SNOWSHOES & MICROSPIKES (I always carry both in case there is not enough snow at the summit but you still need to have good traction), waterproof hiking or winter boots, backpack with lunch, snacks and WATER, emergency blanket/bivy, headlamp (with spare batteries) personal first aid/survival kit, and a navigation GPS device, or satellite messenger.
Suggested Gear: Trekking poles with snow baskets, camera, sun protection/ sunglasses, thermos with hot tea or coffee to enjoy at the top, heated gloves or hand warmers, hiking seat, crazy carpet for butt sliding, lip balm, extra pair of socks to change into at the car.
WINTER TRAIL ETIQUETTE
Don’t snowshoe on ski tracks.
It ruins them for skiers. Instead, use the edges of ski trails.
Don’t park on the trails.
If you stop to eat, change clothing, or take a photo – step off the trail, so others won’t have to.
Keep the trails clean.
Watch out for accidental litter at lunch or snack breaks.
When nature calls ... and there is no outhouse? Carry a plastic bag to pack out your used paper and sanitary supplies.
Let me know if you have any questions or comments below. Happy Snowshoeing!